u-He Diva is an absolute powerhouse of a soft synth for replicating the texture, sound, and weight of hardware gear (at a fraction of the price, we may add). And the fact that it allows a music producer to mix and match the best modules from a variety of synths (filters of a Korg with the oscillators of a Juno) means that there is a near-infinite number of options when it comes to shaping and crafting the sounds that are in your head.
And while experimenting and just hoping for the best can undoubtedly yield some exciting and surprising results, it is better to go into the sound design process with a plan. The longer you use the synth and the more familiar you get with how it operates and what it can do, the faster and easier this plan of attack will become. But until then, it’s best to load up your arsenal with as many different sound design tips and tricks as possible!
So let’s dive into seven of our favorite sound design tips and unsung sound-design features of u-He’s synth to shed more light on the VST and allow you to get more out of your conventional sounds.
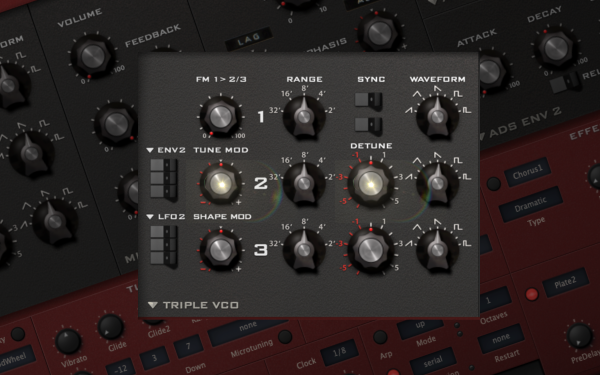
Adjust oscillator detuning to mimic analog synths’ warmth and slight pitch variation.
These days, the gold standard of music production is making music that sounds like it was produced using expensive analog hardware, even though it was made entirely on a laptop using VSTs and samples. Because analog gear was all about subtle textural differences and minor variations in the timbre caused by the heating and cooling of the hardware’s internals, Contrarily, VSTs are digital-software (duh). They will only spit out exactly what you tell them, which results in overly perfect and digital-sounding timbres.
At least unless you put out the conscious effort and attention to detail to reintroduce those anomalies into the sound; luckily, Diva does this better than most any other software synth on the market these days and gives you an almost infinite number of ways to add analog texture and nuance into your patches.
The tuning parameters are the easy and fastest way to get that analog texture and sound, and having slight detunements in the oscillators can instantly turn a sterile patch into something that sounds alive and “expensive.” This can be done directly on the oscillator, in the voice mapping section (discussed later on), using the Chorus FX, and so many other ways.
Stack multiple oscillators at different volumes for thicker, richer soundscapes.
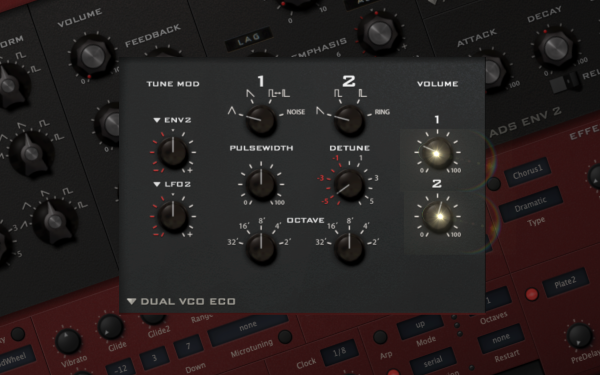
Oftentimes a single Oscillator won’t do the sound that you’re after justice, either lacking the full-bodied warmth and weight that you’re after in the low end or lacking the slight bit of extra bite and sheen needed to cut through a dense mix. This is where the power of blending different oscillators comes into full effect. You can introduce just 50% of a big sine wave to help fill out the bottom of a sound or add a few extra decibels of high-end to an otherwise subdued and damped bass patch.
Harnessing this X-Factor in sound design often involves the strategic use of oscillator automation. This technique enhances dynamic tension and crafts seamless transitions within your track. Consider detuning a supplemental oscillator by up to +/- 5 tones to create a captivating, harmonizing layer to your patch. This alteration will grab the listener’s attention at just the right moments. You can intensify this effect further by enabling the ‘Sync’ function. The ‘Sync’ button compels the oscillators to restart at varying points in their phase due to pitch differences, which generates a unique blend of sounds and heightens the overall impact.
Layer multiple instances of Diva for complex, rich sonic textures.
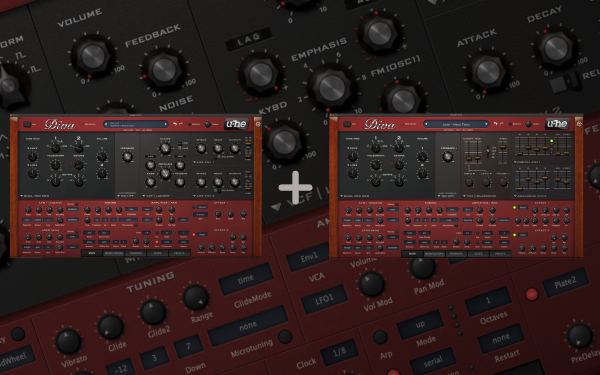
Layering Diva presets serves two primary functions – enrichment and originality. Layering enriches your synth tracks by enhancing their depth and richness, offering a more complete and robust sound. When multiple presets are layered, you fill in for the sonic gaps that a single preset might be lacking, resulting in a well-rounded final product. Layering can also imbue your music with a unique character. While classic analog or digital polysynth sounds are a staple in electronic music, avoiding mimicking others is vital. By layering unique presets, you can add distinct nuances to your synth lines, crafting a more distinctive sound.
Choosing the right presets to layer is an art in itself. Good layers fulfill specific roles – ideally, layer presets that are sonically different and contribute uniquely to the final sound. Conversely, ineffective layering occurs when multiple presets try to reproduce the same sonic texture. For example, layering two similar polysynths presets won’t necessarily enhance your mix’s richness or originality. Instead, it could clutter your mix and consume valuable headroom.
Use high resonance settings for unique, self-oscillating filter effects.
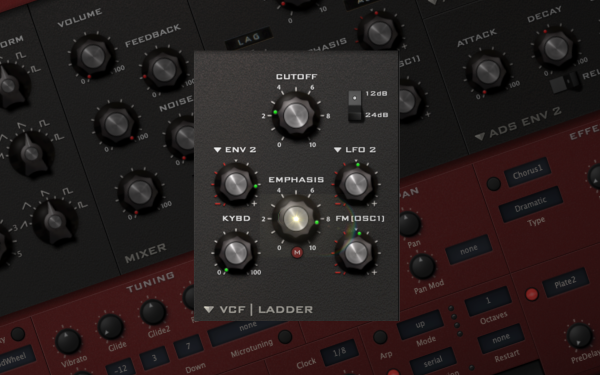
The high-frequency resonant screeching sound was made famous by hardware synths like the Korg MS20 and others for their highly specific sounding way they self-resonated. Producers have long used the often-intense-sounding screech to make truly unique-sounding FXs and tones, some more musical than others.
Try experimenting with egregious use of filter resonances until you find one that you dig, and remember that every filter, both on Diva and on any other filter you use, will have its unique sound and way of filtering the frequencies and resonances. After you’ve landed on one that fits the vibe of the track and patch, try automating it throughout the song. Because of the dramatic shift in textures and sounds that a filter can have once it starts self-oscillating, it can quickly flip a sound from being one thing into something different. What started as a lead patch during the drop section of your track can shift into a cascading squelchy sequence in only a few bars when automated correctly and help transition from one section of the song into the next.
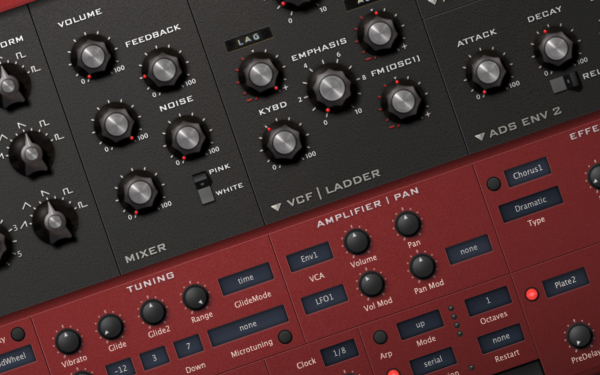
Adjust Diva’s ‘Pan’ control to position your synth sound within the stereo field.
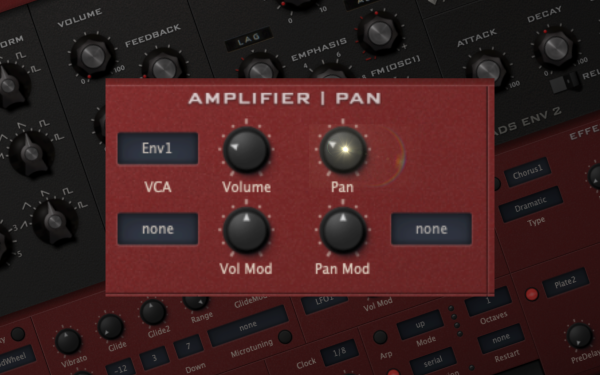
If you want your mix and production to sound full, evocative, and three-dimensional, you must use the entire stereo field. And while a most basic understanding of the process would have newer producers panning individual channels to the left and right on the mixer, you can have more control and get a more detailed result by panning oscillators on the synth itself.
This trick becomes even more powerful when you use your DAW’s automation to have the individual oscillators move across the stereo field as your song plays out. Pair this with a delay module on Diva’s FX section. You can get some interesting interplays on the stereo field as the source sound moves back and forth, with the delay accentuating and echoing the movement as the sound fades out.
More on automation, remember that panning is also a powerful tool to help direct your listener’s attention in the mix. Anything more or less down the middle will, by default, command more attention than elements in the mix’s peripherals. So you can have a lead Diva patch be more or less mono during the more energetic sections of the arrangement and then automate the panning and volume together during the breakdown or calmer section of the track when you want the focus of your listener to go towards a new element in the track.
Explore the ‘Trim’ feature to modulate Diva’s internal workings for unconventional sounds.
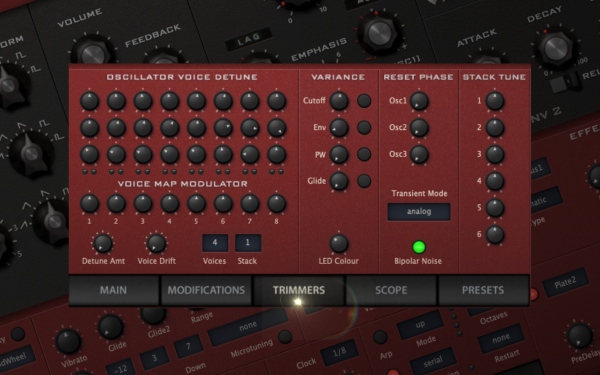
The ‘Trim’ feature in Diva, a powerful synth from U-he, offers a variety of ways to modulate the sound, making each note played uniquely expressive. Some users notice that the same note can sound different when played repeatedly, even with consistent parameters in the trimmers section, a quality that adds depth and life to the sound. This distinctive trait is intrinsic to the architecture of Diva, which emulates the free-running oscillators found in analog synths. However, this seemingly random variation in the sound can be controlled and manipulated.
For example, the ‘Transient Mode’ in Diva plays a significant role in this variability. By selecting the ‘osc reset’ setting in the transient mode, the oscillators can be synced, which results in the same sound being produced each time the same note is played. The transient mode’s primary function is to reset the oscillators or the Voltage Controlled Filter (VCF) for each new voice. This oscillator reset is especially beneficial for creating percussive sounds like bass or drums. However, if the goal is to emulate the true, unique quality of analog sounds, it’s recommended to refrain from using the reset feature.
Further inquiry into Diva’s transient mode reveals three specific settings: the analog mode, the DC reset mode, and the VCF reset mode. The VCF reset is most noticeable when self-resonance is used, creating a free-running oscillator. It’s worth noting that some filters don’t self-oscillate very quickly at lower cutoffs so you might hear a bit of a fade-in. The DC setting, on the other hand, seems to relate more to the virtual DC offset filters. Ultimately, experimenting with all these options and observing the resulting differences can lead to a deeper understanding and mastery of the synth’s potential.
Tweak the ‘Voice Map Modulator’ settings for analog-style variation.
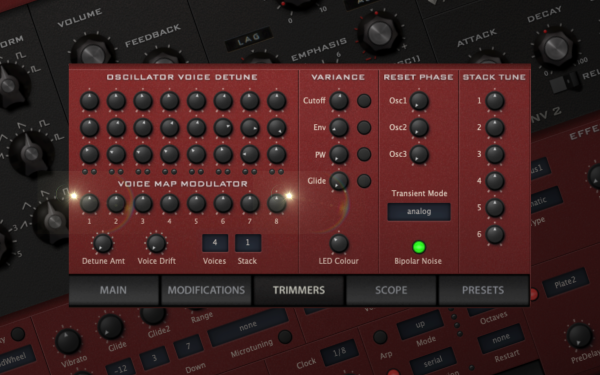
When using a synth like Diva, if you’re playing one-note rhythmic ostinato patterns using more complex preset patches, you may notice that tuning modifiers’ sequences become recognizable, especially if the tuning offsets are extreme between the voices. A method to randomize the tuning for each played note instead of following a strict sequence could add variety to your output.
You can achieve this by adjusting the ‘Voice Map Modulator” settings. On the Modifications tab, set ‘Add to VoiceMap + Random.’ On the Trimmers tab, set the Voice Map Modulator knobs as desired. On the Main page, use ‘Add’ as the modulation source for the ‘Tune Mod’ knob and adjust the amount as required. If the modulation contribution from ‘Random’ becomes too strong, you can hold the Shift key while moving a knob to make changes in smaller increments, barely moving the knob from a 0 setting. Alternatively, use ‘Random’ as the modulation source for the ‘Tuning Mod,’ and apply a small setting on the amount knob.
You could save this as the default device preset for Diva for ease of use in future projects. This process could offer even more control over the randomization of the ‘voice map modulator’ settings, enabling you to effectively vary each voice’s characteristics in a chord or sequence.

Will Vance is a professional music producer who has been involved in the industry for the better part of a decade and has been the managing editor at Magnetic Magazine since mid-2022. In that time period, he has published thousands of articles on music production, industry think pieces and educational articles about the music industry. Over the last decade as a professional music producer, Will Vance has also ran multiple successful and highly respected record labels in the industry, including Where The Heart Is Records as well as having launched a new label with a focus on community through Magnetic Magazine. When not running these labels or producing his own music, Vance is likely writing for other top industry sites like Waves or the Hyperbits Masterclass or working on his upcoming book on mindfulness in music production. On the rare chance he's not thinking about music production, he's probably running a game of Dungeons and Dragons with his friends which he has been the dungeon master for for many years.